How to do Topiary - Hedge Sculpting Guide with The Hedge Barber

Whether you know it as topiary, hedge sculpture or hedge art, growing, training and creating your own topiary is an exciting and rewarding project. Topiary shapes range from simple, geometric shapes to large ornate designs that wow your family and friends.
If you’re looking for a new creative outlet and want to try some topiary for yourself, read our guide to get started.
Hedge trimming art with Andy the Hedge Barber
Before we take a dive into the world of topiary, we’d first like to introduce topiary and hedging expert, Andy the Hedge Barber, who's been working in horticulture for over 10 years. From small and detailed topiary designs to large, jaw-dropping hedge sculptures, Andy’s done it all.
We’ve teamed up with Andy for our topiary guide, sharing his expert tips to help you create your own exciting creations.
“I remember as a young lad going to Disney World in America and seeing all the planted topiary they have around the park of all the Disney characters. This is what sparked my interest in topiary at a young age. I have seen many different shapes, sizes and species over the years, and I’m lucky to have worked on some very nice topiary.”
The art of hedge sculpting
As a horticultural style that’s been used since Roman times, hedge sculptures really make your garden stand out. Depending on your style, you can add a fun element with animal shapes and mythical creatures, or add an elegant touch with flowers, arches or large cubes - you’re only limited by your imagination!
A shaped hedge can create a wow factor for your garden and is suitable for a range of sizes. This horticultural technique also has many names, including hedge shaping and, more commonly, topiary.
What is topiary?
Topiary is the art of growing and pruning hedges and shrubs into ornamental shapes, such as balls, pyramids, animals and mazes. You can find it anywhere from English Heritage and National Trust properties to your neighbour’s garden. Topiary art is often used to separate a garden into zones, or simply as a decorative element that enhances other plants and flowers.
“Anyone can have a go at topiary. All you need is some basic tools for cutting/clipping and a lot of patience! Time is needed to grow and develop each piece and this can be the most frustrating part of the whole process. I would encourage anyone to have a go creating fun organic shapes!”
Best plants for topiary
Some topiary plants are high maintenance as they need to be regularly trimmed throughout the year, but there are some that require less work.
The most common topiary plants are boxwood, yew and evergreen, as they are generally lower maintenance. But these are not your only options. Hedge topiary can also be done with:
- Holly
- Privet
- Lavender (great for fragrance and colour!)
- Shrubby honeysuckle, such as Wilson’s honeysuckle
- Vine plants, such as ivy
If you already know which shape you want, try and choose plants that will work well for this. For example, if you want to create a topiary cone, you should choose a tall plant that grows upright.
“Some species are easier to work with than others due to the density or internal framework. I love to work on Buxus, yew, ilex, hornbeam and Ligustrum.
“Conifer is fast becoming a popular choice for a lot of people as this is fast growing and reacts well to being shaped and trimmed. Blight is a problem in the UK at the moment for Buxus but this can be managed with the right products so don’t let blight put you off. I find working with topiary can be hard if working with something fairly slow growing, due to having to have patience waiting for the plant to develop enough in between the clipping sessions.”
You can either grow your own topiary plant or purchase specifically-trained plants from nurseries. If buying a plant, there’s a few things to look for:
- Ideally, you’d like a young plant with lots of growth
- A full plant with no patches
- No signs of disease
- Uniformity, if buying more than one
- Cutting existing bushes into shapes
You can also use existing hedges and shrubs for hedge sculptures. If it used to be a defined topiary shape, you can easily prune it back to life by cutting back heavily and regularly feeding the plant. If the plant hasn’t been used for topiary before, that’s ok - it’s still fine to use!
Start by assessing the current state of your plant - if you’re lucky, it may be forming into a vague shape on its own! You can then use that as a basis, naturally guiding the shrub as it continues to grow. If not, it’s best to start with a basic geometric shape which you can then craft into your sculpture as it grows. You’ll need to train the plant into shape by trimming it regularly - there are plenty of wireframes out there to make it easier (more on this below).
The overall process may take a couple of years, but patience is worth it as you’ll eventually have a unique-shaped hedge that’ll put a smile on anyone’s face.
What tools do you need for topiary?
If you’re going to start your own outdoor topiary project, you should first invest in the right equipment. Here’s what you need to trim hedges effectively and safely:
- Topiary shears or secateurs for smaller branches and harder-to-reach areas.
- Hedge trimmers - you can find out more about the different types in our hedge trimming guide.
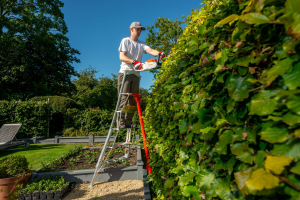
- A garden ladder to reach the very top of your hedge sculpture. You’ll need one that allows you to lean over the top and provides you with lots of space to move about. That way, you don’t have to keep climbing up and down your ladder to move it around your topiary while staying safe at all times.
- Our renowned tripod ladder ensures a wobble-free gardening experience and keeps you comfortable while working hands free on uneven ground. We offer a range of models that come in adjustable sizes, so you can easily keep on top of your topiary as it grows.
- Our Hi-Step ladder is ideal for working at multiple levels thanks to its adjustable legs. Its large, spacious platform means that you can work on a longer stretch of hedge at once, and has a guard rail so you can work hands free for a longer time period.
- Canes, for plant support
- A taut piece of string can also be useful for cutting straight lines.
- Gardening gloves, to keep your hands clean and free of cuts.
- Ground sheet - to make the clean up a little easier!
The Hedge Barber recommends the Hi-Step ladder, as it’s “a great platform ladder with so many good features. It feels so safe when you’re on it and I love how each leg can extend or shorten to follow the contours of the ground with tiny adjustments on the feet. So well thought out that even the feet tilt for sloping ground. Having a large platform means no foot fatigue when up the ladder for long periods of time.
“On larger pieces, I use battery hedge cutting equipment. This helps with reach but also gets the job done quicker and more efficiently. I would definitely recommend battery tools as they are better for the environment, lighter weight, and have come a long way in the last few years with run times and power.”
Topiary Shape Designs and Ideas
There are a countless amount of topiary ideas you can try - the sky’s the limit! Here’s a few popular topiary shapes:
- Single or double spirals
- Tiered trees, some with multiple trunks
- Animal shapes, including dogs, cats, elephants and more.
- Whimsical characters, such as well-known characters, hearts or even chairs!
- Geometric shapes
- Words and letters
- Mazes and arches
Our expert Andy has seen all kinds of topiary over the years: “Green Animals Topiary Garden in Rhode Island USA has a large amount of mature topiary in shapes such as an elephant, an ostrich and a unicorn. Levens Hall in the Lake District has the world’s oldest topiary garden, still in its original design. The topiaries reflect the late-17th-century style for clipping large specimens for geometric forms. The parterres are framed with towering, tiered topiary, with bags of character and somewhat look like a scene from Alice in wonderland.”
How to make topiary shapes
Once you know which topiary shape you’d like to make, the next step is choosing your plant.
Usually, large or wide topiary needs a plant with more than one stem or trunk, whereas for longer, vertical shapes, you just need one central stem as a leader. You can use canes to keep the plant straight as it grows. Make sure it has enough space, especially if growing multiple topiary plants.
“Stand back and visualise the end result you are trying to achieve before you start. Keep stepping back from the piece to view it from different angles.”
If you’re feeling unsure about cutting bushes into shapes, you can start simple. Try geometric shapes first, such as balls, cubes and pyramids. As the plant grows, you can start clipping it into shape, either by hand or using a frame. Below are a few quick guides for easy topiary shapes designs: balls, spirals and animals. Note that our step-by-step guides below are for trimming freehand, without a wire frame.
How to make topiary frames
A quick note on topiary frames before we get into the shaping - topiary frames are a popular option that can make growing and pruning your plants easier. You can purchase a selection or even make your own from scratch.
Topiary frames can be bought from both topiary-specific and everyday retailers and can be found in an array of shapes and sizes - plenty for you to choose from. Making your own is also simple and usually requires chicken wire - you can find out how to make topiary frames in this guide.
How to do topiary balls
Andy has provided his tips for making a topiary ball:
1. To make a topiary ball, start by cutting away dead branches and leaves.
2. Break down the ball into 3 sections - top, middle and bottom.
3. Cut a band round the middle of the ball, to give you an idea of the width.
4. Then start to round off from the middle to the bottom, working around to check the curve you are creating is symmetrical from different angles.
5. Once this is completed, start working from the middle up to tie the top and bottom in, leaving you with symmetrical curves and creating the ball shape.
6. If you spot any branches or leaves poking out, go back around with your shears to tidy it up into a neat ball.
7. Give it a quick water and you’re all done!
“I would have to say the easiest shape to start with is the simple but not so simple ball. This is something that you can buy pre done and then just practice to maintain the shape as it starts to grow out. Or, if feeling adventurous you can look to create one from an existing plant you have, it’s all about stepping back to look at the shape and picture in your mind’s eye the finished piece.
“When cutting a ball moving around the ball as you work this helps to stop cutting a flat spot as you will naturally work closer to your body.”
How to trim a spiral tree
Spiral topiary can seem complicated, but it’s a relatively simple shape to make.
1. Start by pruning your plant into a vague cone shape, working from top down. If you’re starting with a young, small tree, It’s easier to spiral string or ribbon around the plant before trimming to use as a template.
3. Cut grooves in between the ‘stripes’ of the ribbon using sharp shears/secateurs. Make sure you cut close to the trunk or stem.
4. Once you’ve reached the bottom, remove the ribbon and tidy up the spiral shape, rounding any curves and making the spirals thinner if you prefer.
5. Feed and water regularly to ensure your spiral thrives.
How to make topiary animals
Topiary animals may feel intimidating, but there are some that can be quite easy to do:
“A lot of people these days buy wire mesh frames in the shape of an animal and place these over the plant so the plant can grow up through the mesh and once grown to size the plant is clipped to follow the structure of the mesh, this then creates the solid shape and hides the mesh below the foliage. I have seen this done with a life-sized mini cooper car but more commonly in animal shapes such as cats, dogs, deer and birds.”
Here’s how to make topiary animals:
1. At the start of the plant’s growth, you only need to do some general shaping to start with. Once the hedge reaches its adult stage, you can then go in with precise shaping.
2. When creating large topiary animals in a sitting position, start by trimming your hedge into a large rectangle shape. For animals standing up, use longer, thinner shrubs.
3. Insert canes where you’d like the head, arms, legs and tail (if applicable) to be. Keep taking steps back to see what the hedge looks like. It can help to draw the animal shape on a large sheet of cardboard if possible, which you can use as a template.
4. When you have a vague shape, tidy it up with sheers. Do this little and often.
5. As the plant grows, continue pruning into the desired shape, removing new growth as needed.
Topiary Care and Maintenance
Patience is needed when it comes to topiary care, but there’s a few things you can do to help your plants along.
Firstly, you’ll need to trim your hedge regularly to maintain the shape. If you’re pruning multiple topiary plants, make sure to sterilise your blades in between each plant - you don’t want to transfer any diseases as you go.
Also, if possible, try and prune on grey, overcast days, as cutting on warm days may scorch the new, fresh leaves. Regularly apply mulch as the plant grows and water often over summer, less so over winter.
“If clipping in hot conditions, clip when the plant is in the shade or cover with a damp dust sheet in order to protect the freshly trimmed leaves from sun scorch. Damping the sheet down helps to rehydrate the freshly cut leaves and aids the plant in healing better and faster.
“Feeding the plants will aid in health care and growth. If looking to feed a Buxus plant, there are a number of feeds available out there, such as liquid seaweed, slow release granules and folia sprays. These will all aid the plant providing vitamins and minerals needed to grow and develop.
“Keep an eye out on your topiary plants for any pests and disease. If you spot any, investigate, research and act at the earliest opportunity to stop the problem before it becomes a bigger issue.”
And when trimming season does come around, don’t forget to lay down your ground sheet first to avoid a messy clean up job afterwards!
Create Sculpted Hedges with Henchman
Topiary is a fun and rewarding project that every gardener can do, and the shapes you create will enhance your garden and impress everyone who visits.
Henchman has high quality tools that make trimming your hedge sculptures easier. From safe, stable ladders that allow for hands-free work, to sharp secateurs and a garden mat to quickly clear away mess, topiary maintenance will become an easy job with the help of our tools.
If you’d like to find out more about our products, then we’re happy to help. Speak to our expert team today by calling 03333 444229.


